

Charming Loft
Information Booklet
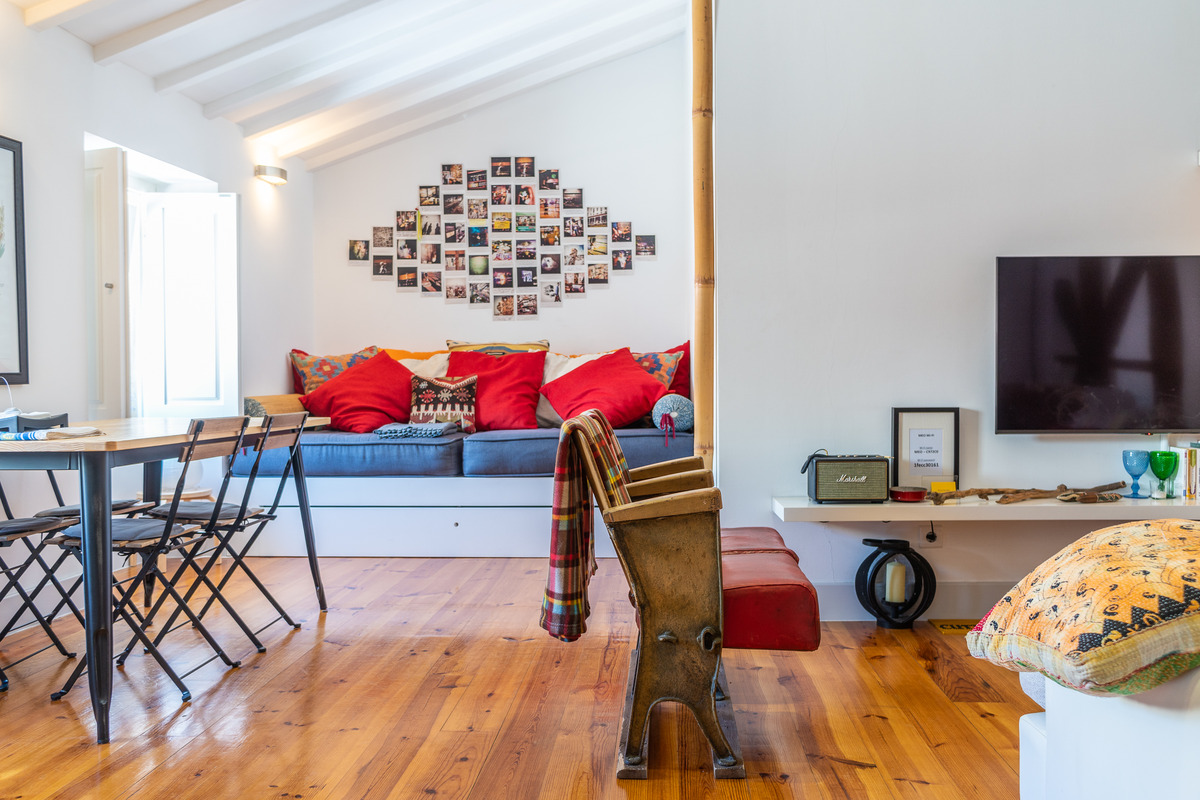
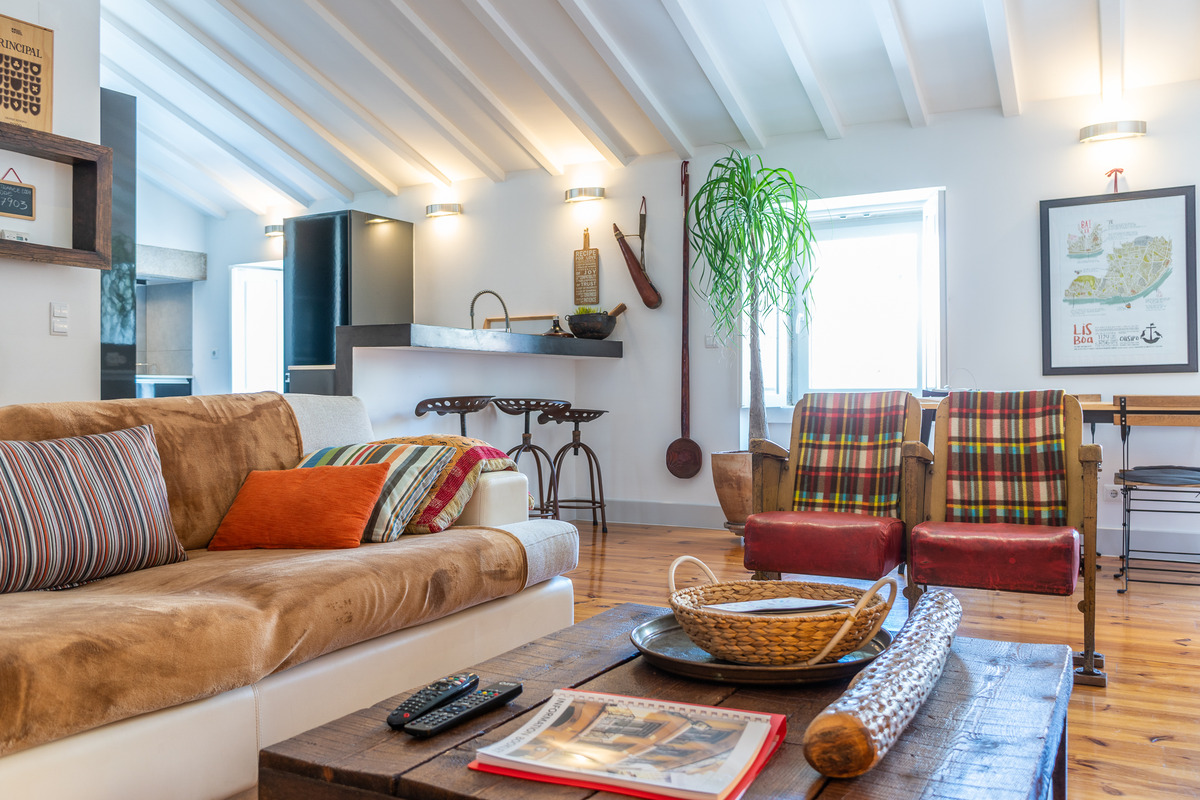
This comfortable and magnificent apartment, located in the center of Lisbon, has an area of about 110 m2 and can easily accommodate up to 5 people. Located in the most upscale area of the city, next to Avenida da Liberdade, it allows easy access on foot to the more touristic places of the capital and, if desired, to public transport services.
The apartment has been completely renovated in an architect-led project that valued and modernized the original characteristics of a 18th century building. Combined with its original and eclectic decoration, and its comfortable amenities, I dare argue this is an excellent base for your holiday.
It is my wish you can get the most out of your stay in Lisbon, whether it’s long or short. In this manual, you will find all the information you need for an optimal enjoyment of the Charming Loft. You will find practical information on safety, use of domestic appliances and other equipment, as well as some suggestions on places to visit.
Have a great holiday!
Menu:
IN CASE OF AN EMERGENCY
- CALL 112
APARTMENT ADDRESS: RUA SÃO JOSÉ 186, 4O
1150 – 326 LISBOA
For emergency services (ambulance, police, fire) please call 112 immediately, identify yourself and
indicate the location of the apartment. The address is at the top of this page.
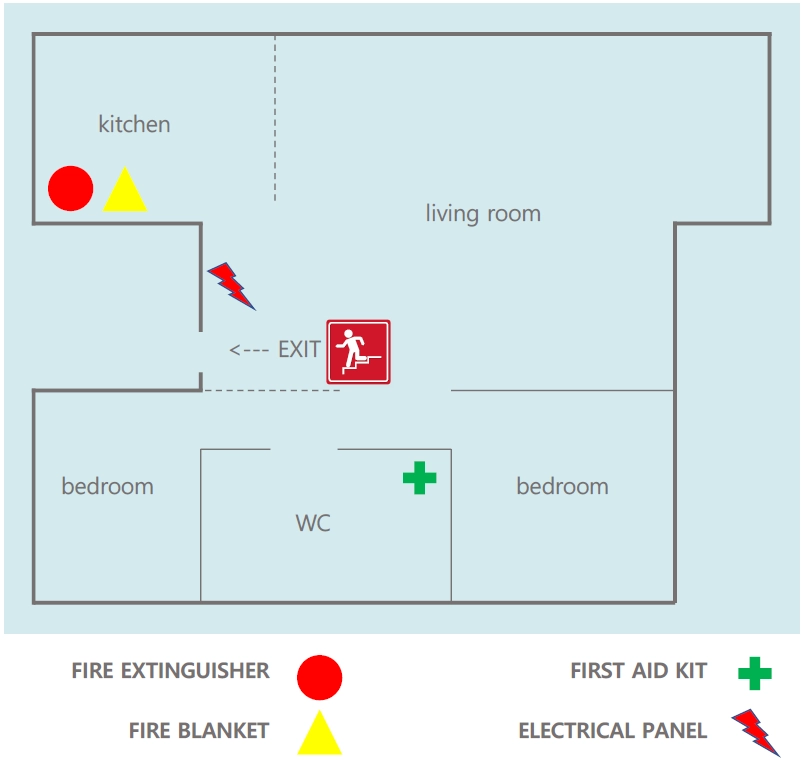
In case of a fire, the location of the fire extinguisher and fire blanket are identified in the diagram below (Safety Card). Exit the apartment as quickly as possible and make sure no-one is left behind.
Contact me after calling 112.
Medical emergencies, available 24/7: +351 80 824 24 24.
Our phone numbers: +351 91 762 24 54 / +32 473 83 27 28.
SAFETY CARD
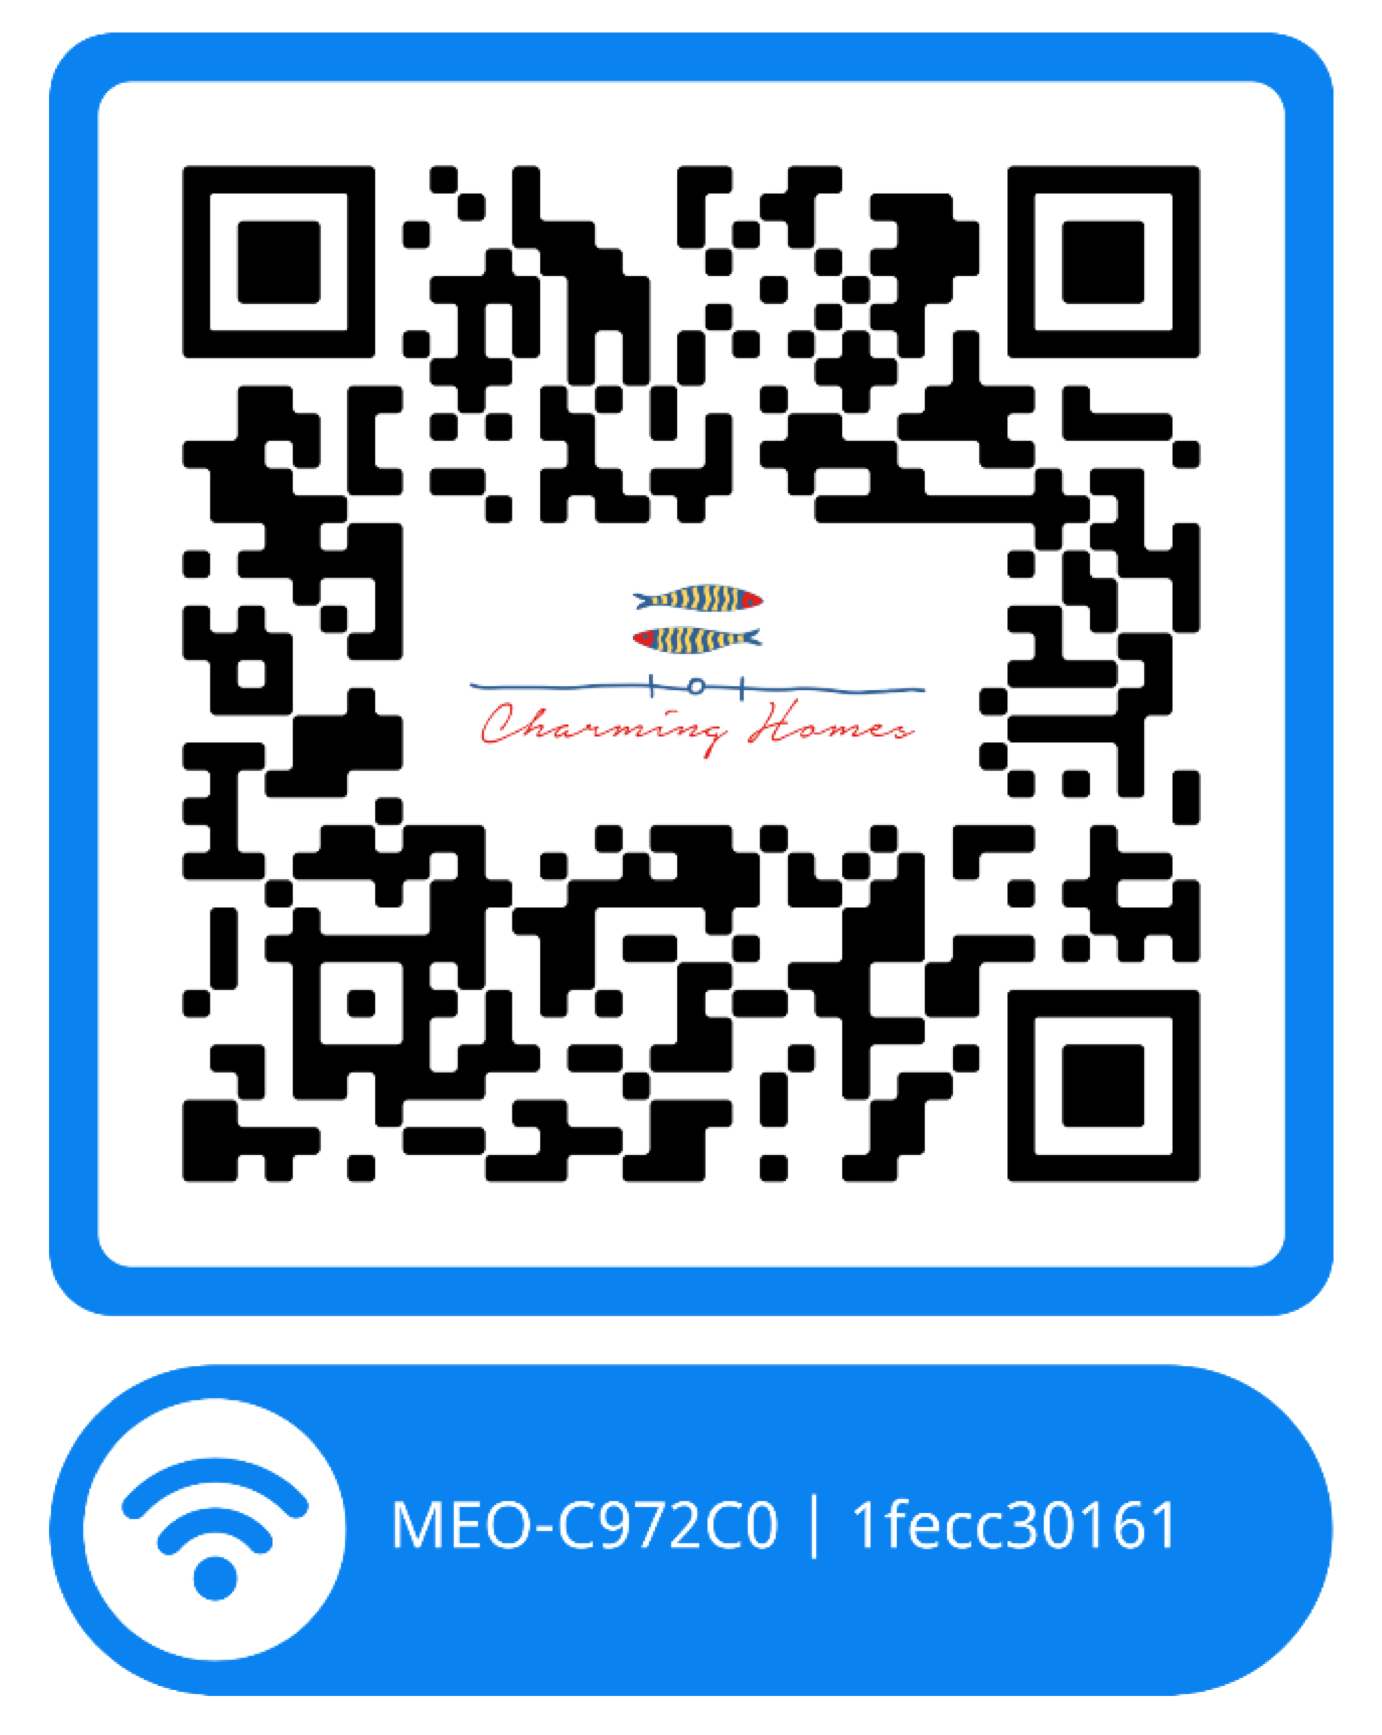
INTERNET
HOUSE RULES

QUIET HOURS
21:00h to 08:00h
- Check-in from 16:00h
- Check-out until 10:00h
ELECTRICAL PANEL
The electrical panel is situated to the right of the main door. If one of the household appliances fails to work or if there isn’t electricity in one on the rooms, please check first whether any of the switches is/are down. If so, you should turn the respective switch back up. In case of a general power failure, turn up the two red switches or press the black button on the left side main switch.
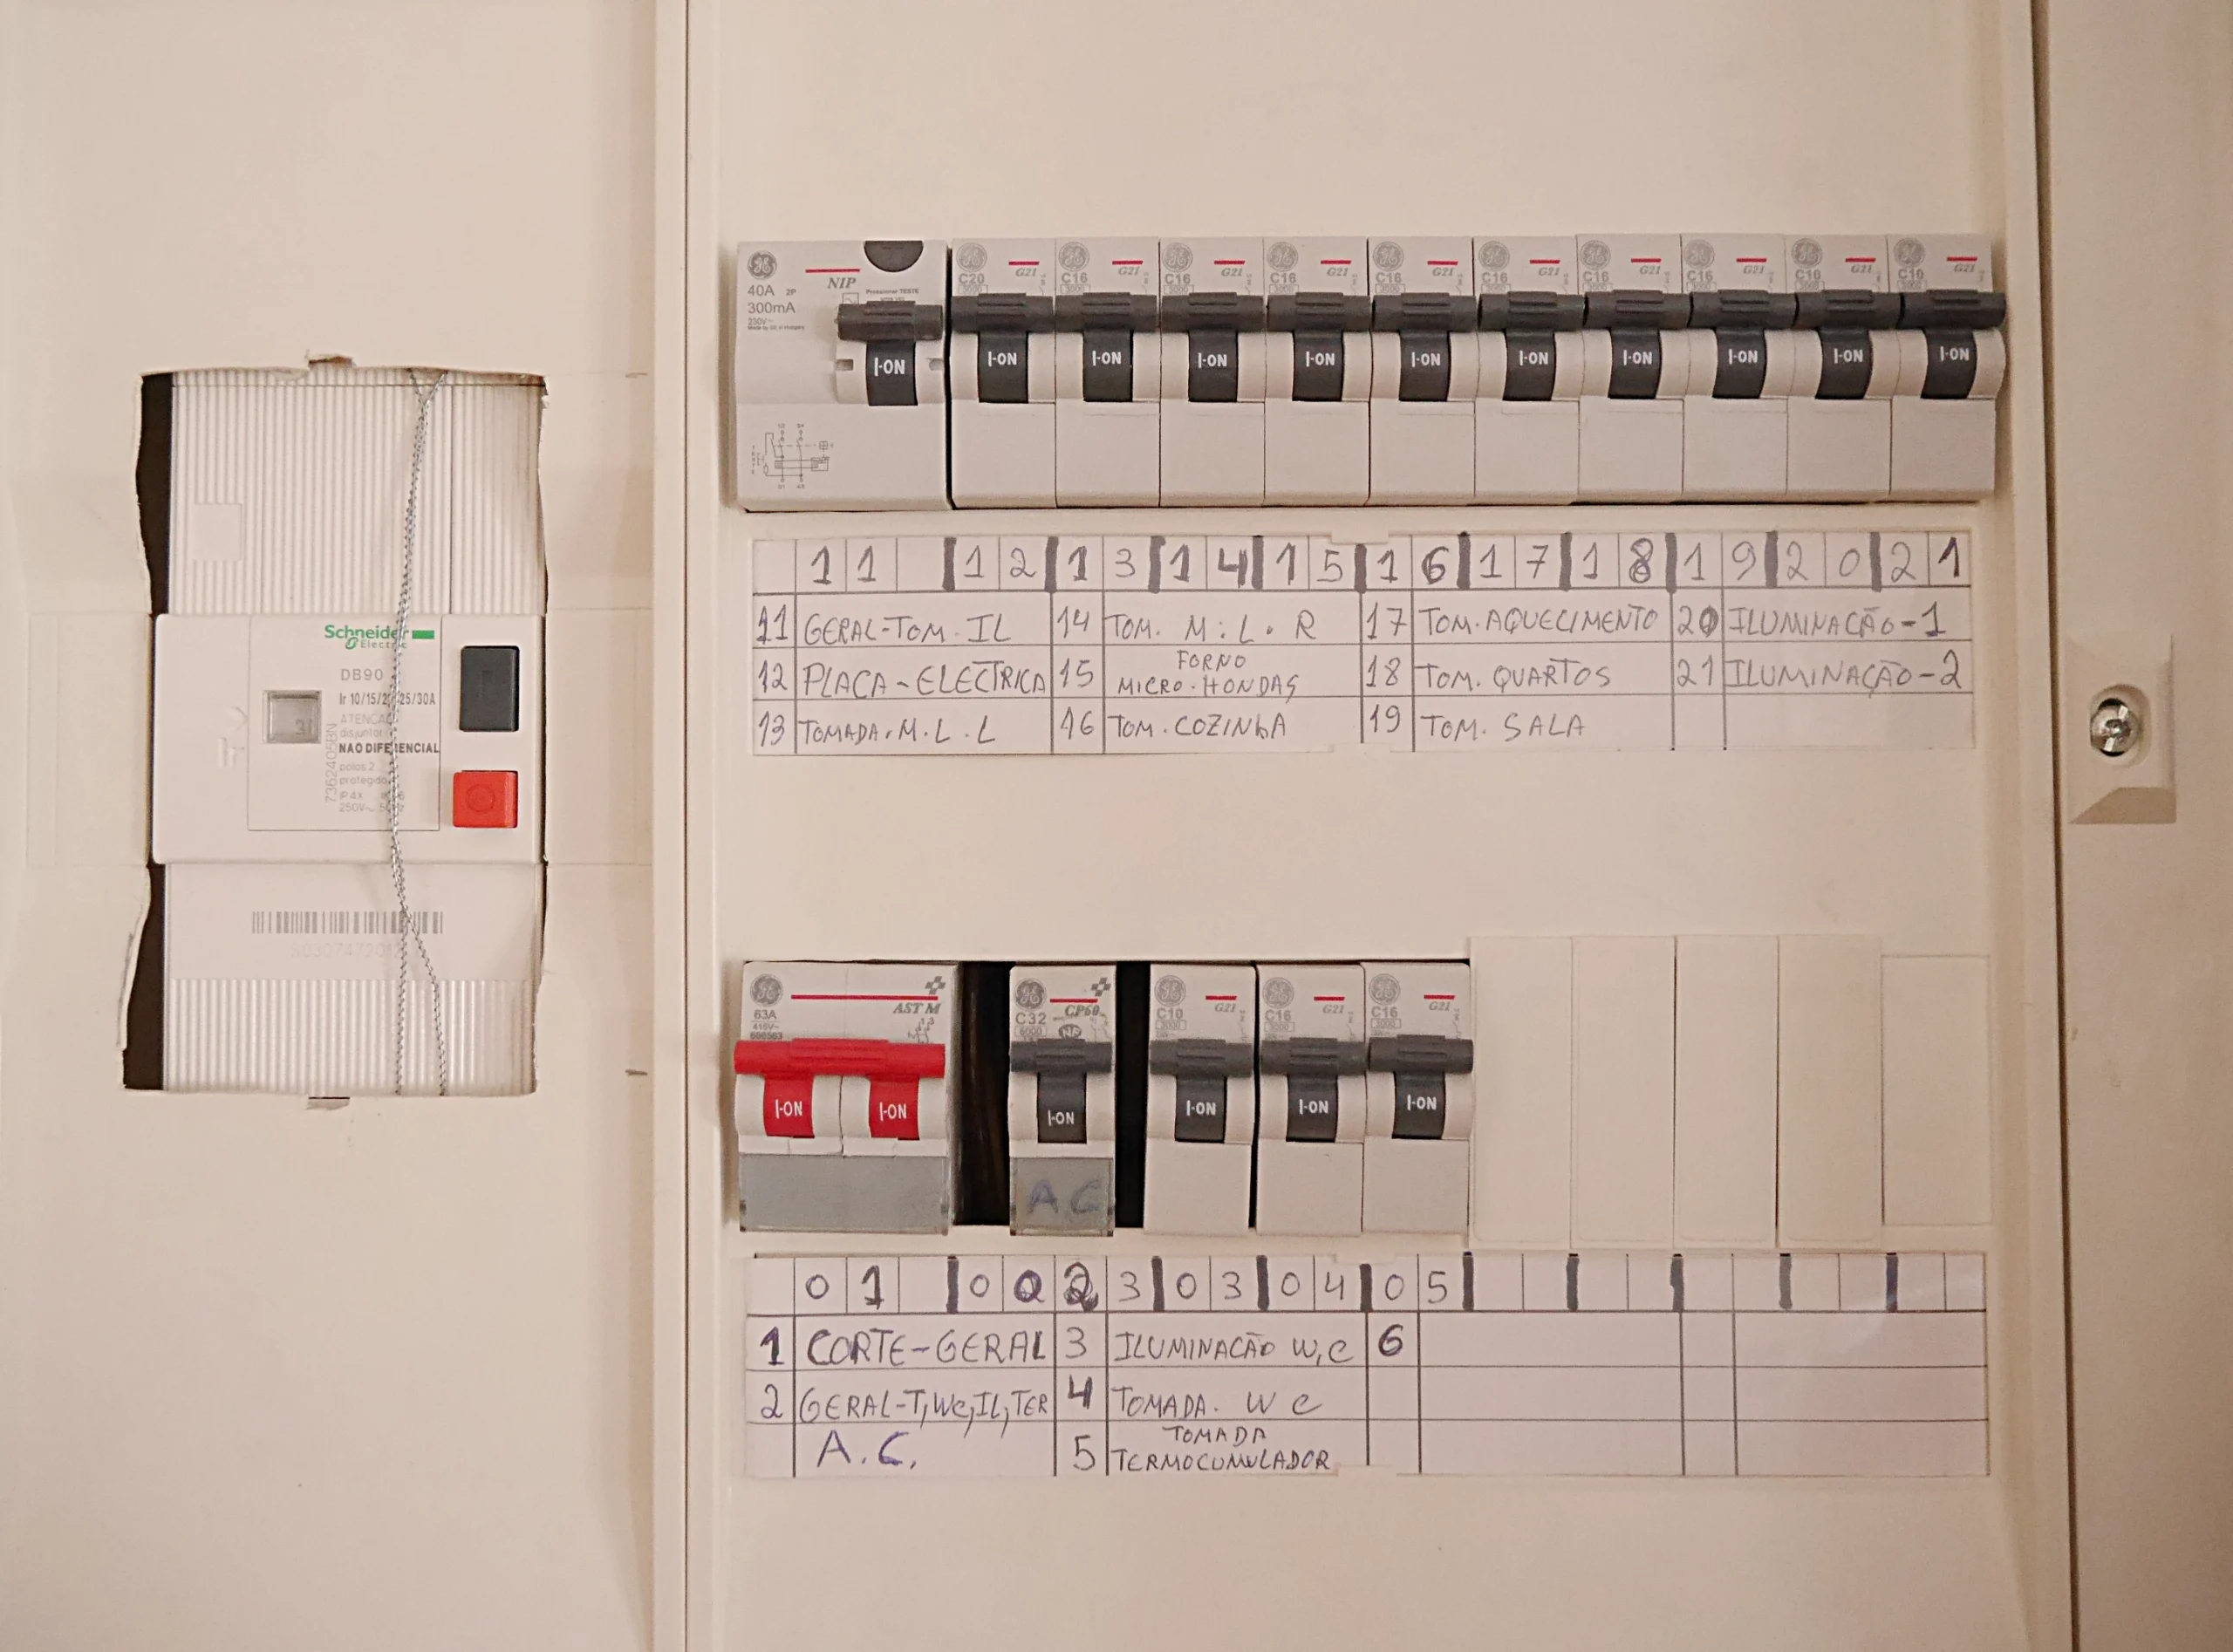
The electrical panel is situated to the right of the main door. If one of the household appliances fails to work or if there isn’t electricity in one on the rooms, please check first whether any of the switches is/are down. If so, you should turn the respective switch back up. In case of a general power failure, turn up the two red switches or press the black button on the left side main switch.
- 1 - General Power switch
- 2 - General Airco power
- 3 - Lights bathroom
- 4 - Bathroom outlets
- 5 - Thermo switch
- 11 - General electrical outlet
- 12 - Ceramic hot plate
- 13 - Dish Washer
- 14 - Washing Machine
- 15 - Oven and Microwave
- 20 - Lights
- 21 - Lights
HOUSEHOLD APPLIANCES
- Microwave*
- Electric Oven*
- Ceramic hot plate*
- Fridge with separate freezer
- Washing machine*
- Disherwasher*
- Nespresso coffee maker*
- Toaster
- LED TV with cable connection
- WiFi modem
- Marshall sound system (connect mobile device via Bluetooth or cable)
- Air conditioners Living Room*
- Air conditioners Bed Room*
* For these appliances there is a user’s manual available in the folder located in the drawer under the oven.
MICROWAVE
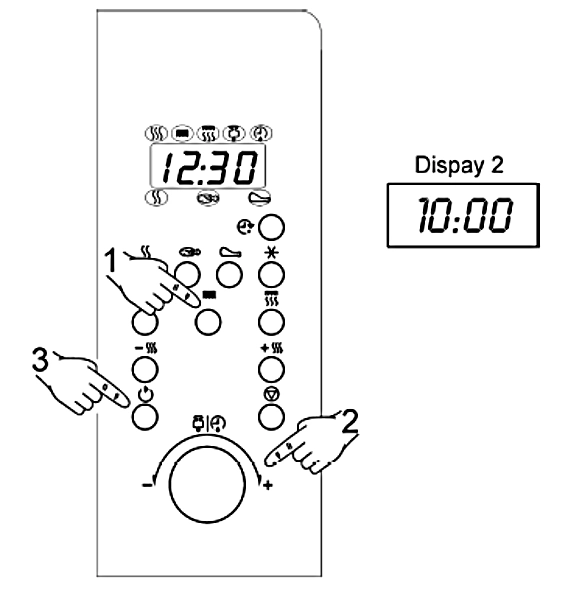
Microwave Function
- 1. To operate the microwave press the MICROWAVE key: the Microwave function indicator lights up.
- 2. Introduce the functioning time (example: 10 minutes), by turning the ROTATING KNOB left or right.
- 3. To change the microwave power, press the – and + keys. If these keys are not pressed, the microwave oven work as default at maximum power.
- 4. Press the START key. The microwave starts working.

Grill Function
- 1. Press the GRILL key: the Grill function indicator lights up.
- 2. Introduce the functioning time (example: 10 minutes), by turning the ROTATING KNOB left or right.
- 3. Press the START key. The oven Starts working.
ELECTRIC OVEN
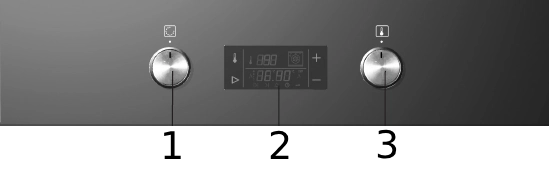
- 1. Power Button & Function Selector
- 2. Electronic programmer with numerical display of temperature and cooking mode
- 3. Temperature adjustment knob and other numerical value adjustments
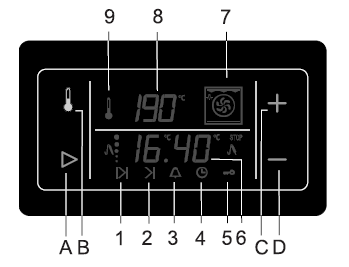
Sensitive keys
- A. Selection and validation of settings
- timer / probe temperature
- B. Oven temperature adjustment
- C. Temperature adjustment knob and other numerical value adjustments
- (more)
- D. Adjusting decreasing numeric values
- (any less)
Views
- 1. Cooking Duration
- 2. End of cooking time
- 3. Audible indicator
- 4. Time of day
- 5. Child lock
- 6. Clock - Time Display / Probe Temperature Display
- 7. Cooking Mode
- 8. Temperature
- 9. Icon indicating that the heaters heat up
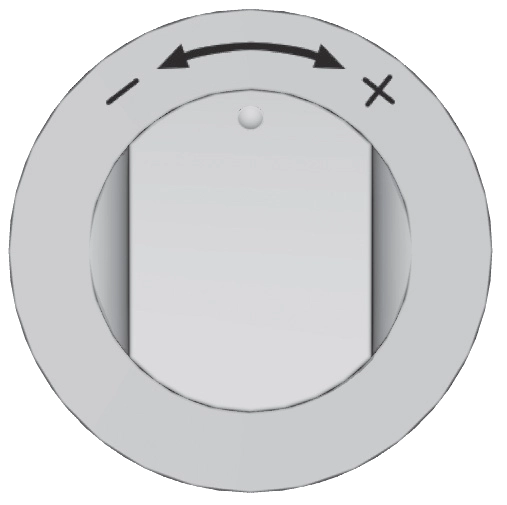
Temperature indicator
- When you have turned the function selector, the corresponding cooking mode icon will light up and the preset temperature will appear. The “°C” symbol flashes for a few seconds.
- While the “°C” symbol flashes, you can lightly touch the sensitive button (C) or (D) to change the recommended temperature from 30 to 275 °C. For some cooking modes, the maximum temperature is limited.
- The temperature rise in the oven appears at intervals of 5 ° C. While below 30°C, “--- °C” appears. A lit icon (9) indicates that the heaters heat up.
- When the set temperature is reached, the icon (9) goes out and a quick beep sounds.
- You can change the cooking temperature at any time; To do so, first tap the sensitive key (B); “°C” symbol flashes for a moment; Then enter a new value using the (C) or (D) key.
CERAMIC HOT PLATE
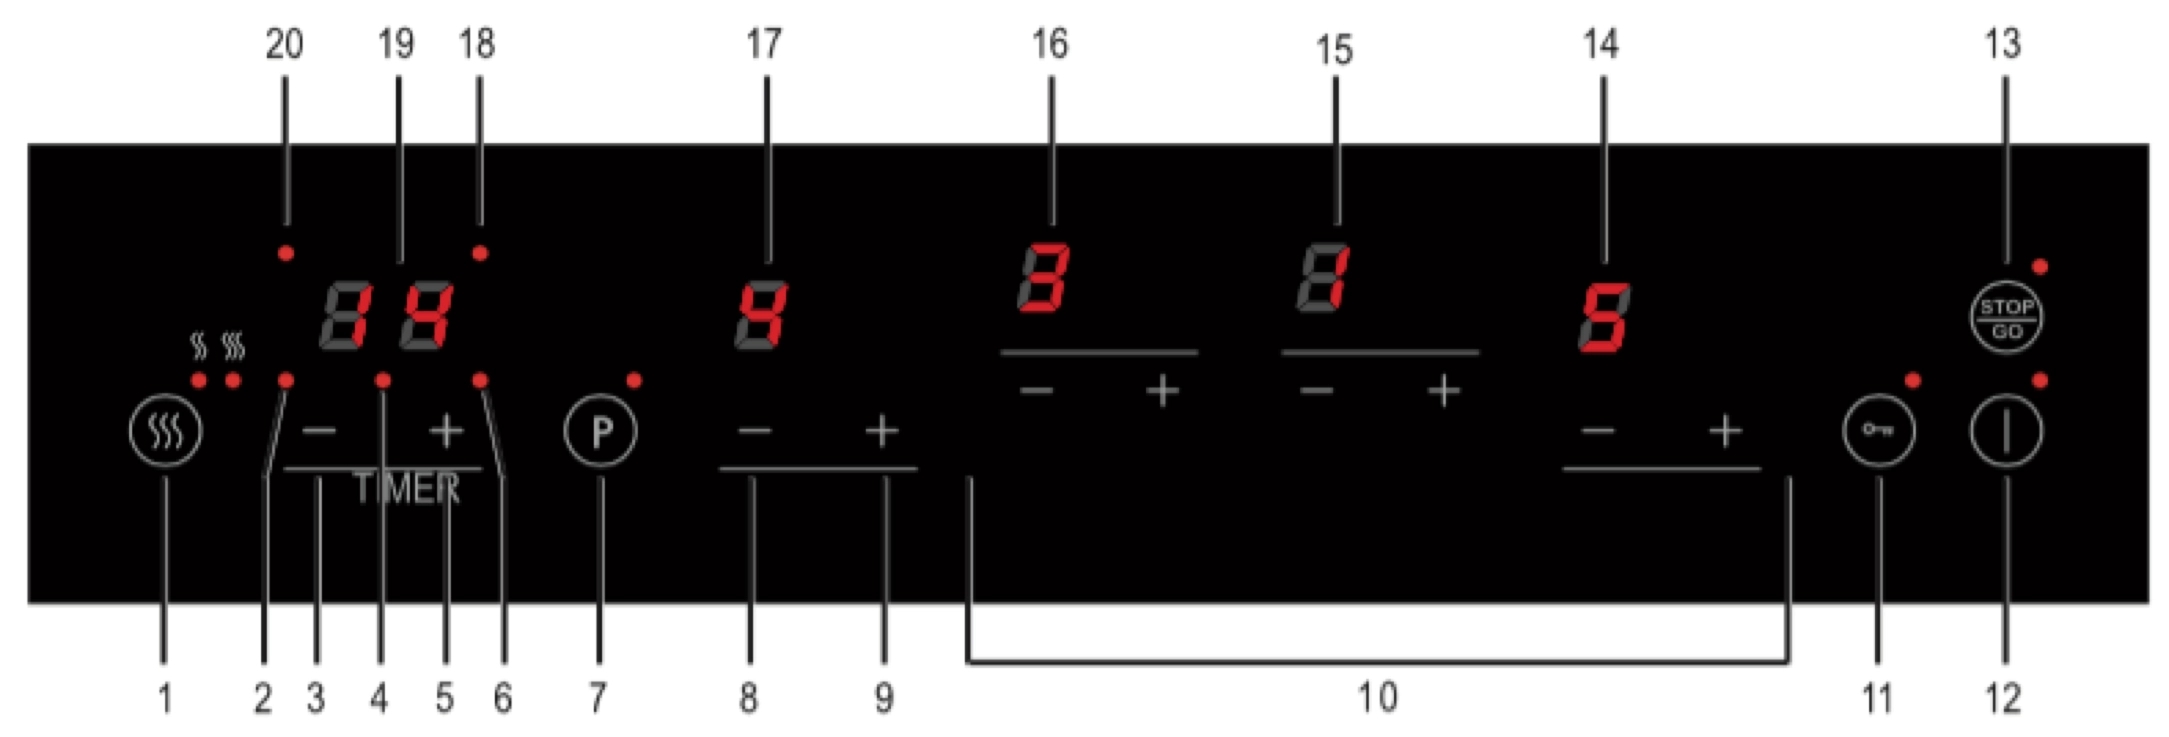
- 1. Keep food warm/melt with indicator
- 2. Cooking timer indicator left front zone
- 3. Reduce time button
- 4. Minute minder indicator
- 5. Increase time button
- 6. Cooking timer indicator right front zone
- 7. Boost with indicator
- 8. Decrease power left front zone
- 9. Increase power left front zone
- 10. Controls other cooking zones
- 11. (Child)lock with indicator
- 12. On/Off button with indicator
- 13. Stop/Go function with indicator
- 14. Setting indicator right front zone
- 15. Setting indicator right rear zone
- 16. Setting indicator left rear zone
- 17. Setting indicator left front zone
- 18. Timer indicator right rear zone
- 19. Timer indicator cooking timer/minute minder
- 20. Timer indicator left rear zone
How to operate the hot plate and setting the power
- 1. Put a pan on a cooking zone. Use only the pans that are available in the apartment as not all type of pans are suitable.
- 2. Touch the On/Off button.
- You will hear a short beep and the display for each cooking zone will show ‘0.’. The red light to the right above the On/Off button is constantly illuminated. If no further action is taken, the cooking zone will automatically switch off after 10 seconds.
- 3. Use the button + or the - button in the desired cooking zone to choose the correct setting. The hob will automatically start in the chosen setting (if it detects a pan).
Washing Machine
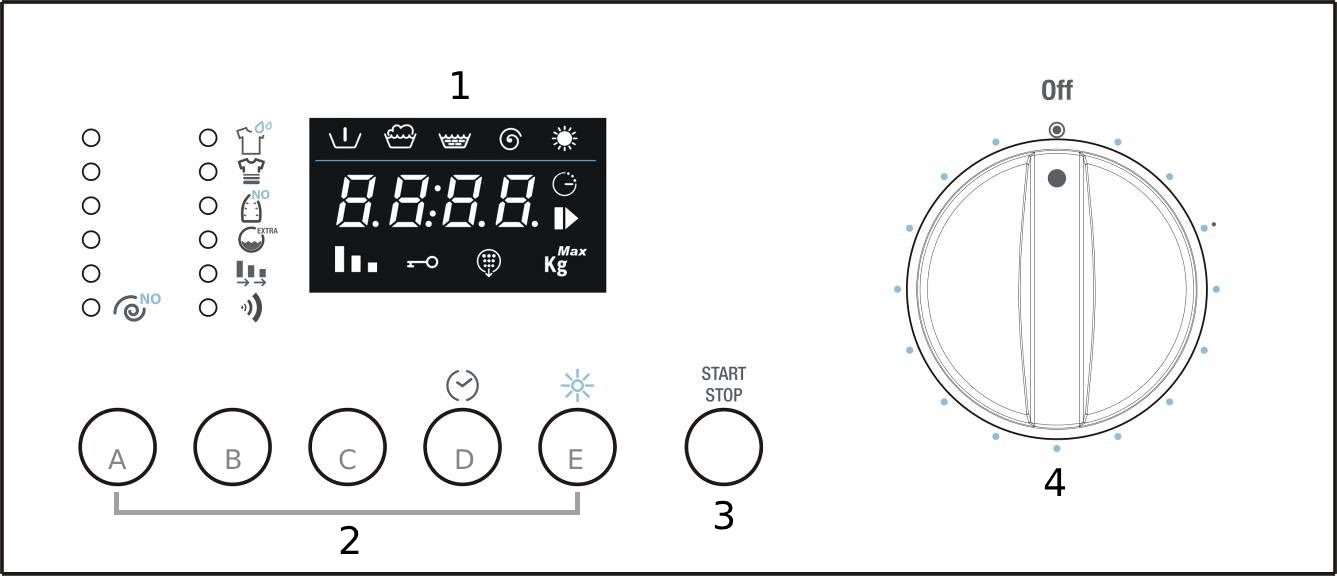
Control Panel
- 1. Display: Shows the settings (spin speed, cycle status, flexi time, maximum recommended weight, drying levels, child lock, clean programme). The settings can be modified using the buttons underneath.
- 2. Buttons (Left to right):
- A • Spin speed selection
- B • Option selection
- C • Confirm option
- D • End time
- E • Drying
- 3. Start/Pause Button: For starting and stopping working cycles.
- 4. Programme Selector: For switching the washer-dryer on and off and selecting programmes. Can be turned in either direction. Does not turn while programmes are in progress.
Opening the door
- Warning: If the washing programme is interrupted, it will be from 3 to 15 minutes before the door can be opened, depending on the temperature reached inside the appliance
Adding detergent and additive

prewash detergent.


for fabric conditioner, starch, additives, etc. (e.g. treatment products). The additives are added to the washing tank automatically during the final rinse.
Switching on the appliance and selecting the washing programme
- 1. Turn the selector knob in either direction. This switches on the washer-dryer.
- 2. Select the washing programme. The time left to the end of the programme and the maximum recommended weight for the selected programme alternate on the display. The symbols on the display light up to identify the information shown.
- 3. The default spin speed values are shown. The initial settings can be modified using the button underneath the sequence of spin speeds.
- 4. If spin speed “0” is set, there will be no spin cycle and the appliance will stop with the tank full. If this value is set, the appliance does not perform the final spin and the washing programme ends with water in the tank.
Starting the washing programme
- 1. To start the washing programme after making your personal settings, press the Start Pause button.
- 2. Once the cycle has started, the display shows the time remaining before the end of the cycle and the Start Pause symbol on the display is constantly on.
- 3. During performance of the washing/drying programme, the symbols which identify the various phases light up.
DISH WASHER

Description of the controls
- 1. ON/OFF Button: Pressing this button energizes the appliance.
- 2. Selected program indicator lights: Illumination of this light denotes the program selected and the occurrence of a fault (troubleshooting)
- 3. Program selection button: By pressing this button in sequence it is possible to select the desired program.
- 4. Water hardness adjustment ON indicator light: The light flashes to indicate that the appliance is in “water hardness adjustment" mode.
- 5. Rinse aid warning light: Illumination of this light signals that rinse aid dispenser is empty.
- 6. Extra dry + Extra option button: Press the button to enable/disable the option.
- 7. Extra dry light: Illuminates to indicate that the function is activated.
- 8. HYGIENE OPTION + EXTRA OPTION button: Press the button to enable/disable the option.
- 9. HYGIENE OPTION Light: Illuminates to indicate that the function is activated.
- 10. Half load button: Press this button to activate the half-load wash option
- 11. Half load light: Illuminates to indicate that the function is activated.
- 12. "3/1" OPTION (EXTRA OPTION) Light: Illuminates to indicate that the function is activated.
- 13. Program DELAY button: Press this button to delay the start of the program.
- 14. Information display: (1 or 3 digits depending on model).
Washing programs
- Before starting a washing program, please make sure that:
- The water supply tap is open.
- The correct amount of detergent has been added to the dispenser.
- The baskets have been correctly loaded.
- The spray arms are able to rotate freely and without obstruction.
- The dishwasher door is securely closed.
Spread half load
(available in all programs except the soak program)
When there are not many dishes to be washed, the “spread half load” option, controlled by button (10) is useful; it saves water and electricity and reduces the program’s duration. Place dishes in both baskets then load the detergent dispenser than less than the normal amount for a full load.
Delayed start
(available in all programs except the soak program)
The start of the washing program can be delayed to program the dishwasher to operate at the preferred time of day (e.g. overnight). Press the PROGRAM DELAY button (13) to activate the option and display (14) a 1 hour delay. Keep pressing to select the delay required, which is up to 9 hours. When the door is closed, the appliance will prewash the dishes, after which the “program delay” set will come into effect.
Cancelling the curent program
(available in all programs except the soak program)
To cancel the currently selected program, open the door and hold down the PROGRAM SELECTION (3) button for a few seconds until the indicator lights for programs 4 and 5 illuminate simultaneously (the word “end” is displayed on the window).

End of cycle
(available in all programs except the soak program)
At the end of the washing cycle the dishwasher gives a short acoustic signal and the program indicators nr 4 and 5 start blinking (the word “end” is displayed on the window). The program in progress light (floor light) stops flashing and remains constantly on. To switch off the dishwasher, open the door and press the ON/OFF button (1).

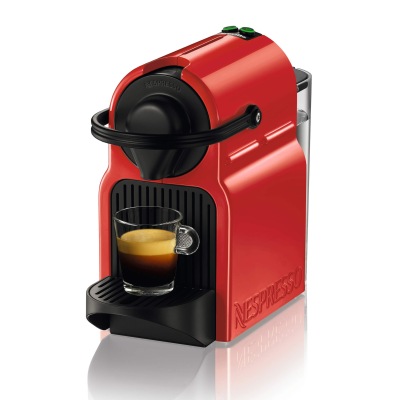
NESPRESSO COFFEE MAKER
Preparing coffee
- 1. Rinse, then fill, the water tank with potable (tap water or mineral) water. The water tank can be carried by its cover.
- 2. Switch the machine on. Blinking light = heating up, approx. 25 seconds. Steady light = ready.
- 3. Lift the lever completely and insert the capsule.
- 4. Close the lever and place a cup under the coffee outlet.
- 5. During heat up, you can press the coffee button when it’s still blinking. The coffee will then flow automatically when the machine is ready.
- 6. For a Latte Macchiato glass, fold the cup support into the upright position. It will automatically lower when the glass is removed.
- 7. Press the Espresso (40 ml) or the Lungo (110 ml) button. Preparation will stop automatically. To stop the coffee flow or top up your coffee, press again.
- 8. Take the cup. Lift and close the lever to eject the capsule into the used capsule container.
Troubleshoot
- Front light is red → The water tank is empty or needs to be cleaned.
- Coffee not hot enough → Preheat the cup. Descale the machine if necessary.
- Lever does not close completely → Empty the capsule container. Check that there is not a capsule blocked inside the machine.
- Machine switches itself off → To save energy, the machine will turn itself off after 9 minutes of non-use.
- Leakage or unusual coffee flow → Check that the water tank is in position.
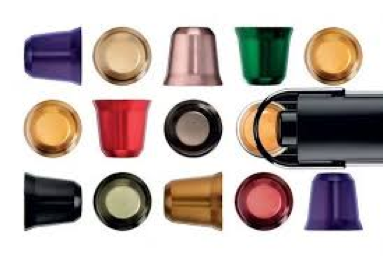
Capsules
TV CONTROLS
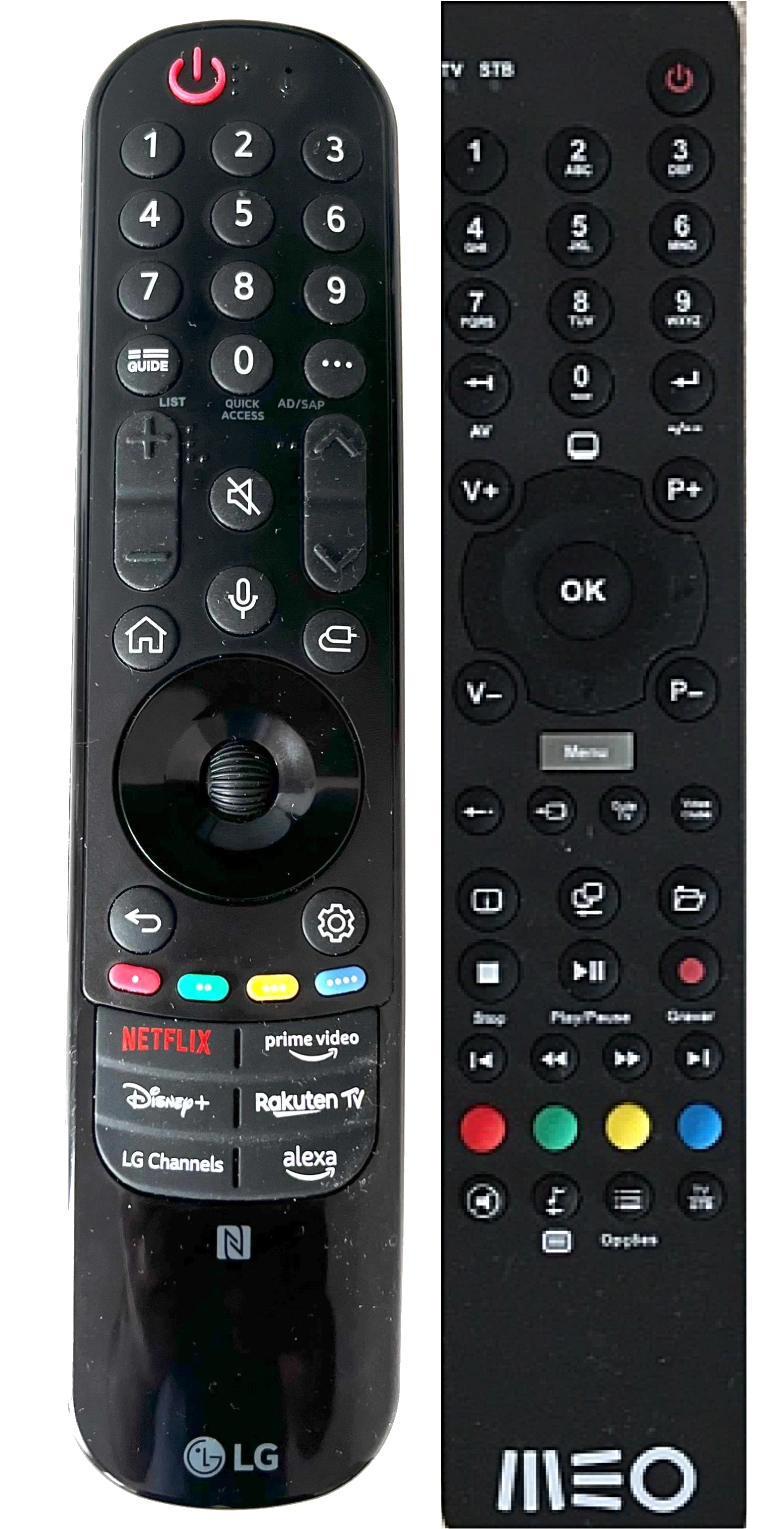
- On/Off button
How to switch on the smart TV:
- 1. Switch on the TV by pressing the On/Off button on the TV remote control.
- 2. Switch on the channel box by pressing the On/Off button on the MEO remote control.
- 3. From now on all the control of the TV is via the MEO remote control:
- Press the P+ or P- buttons to change channel selection up and down.
- Press the V+ or V- buttons to increase or decrease the volume.
- 4. To switch off, press the On/Off buttons on both remote controls.
SOUND SYSTEM
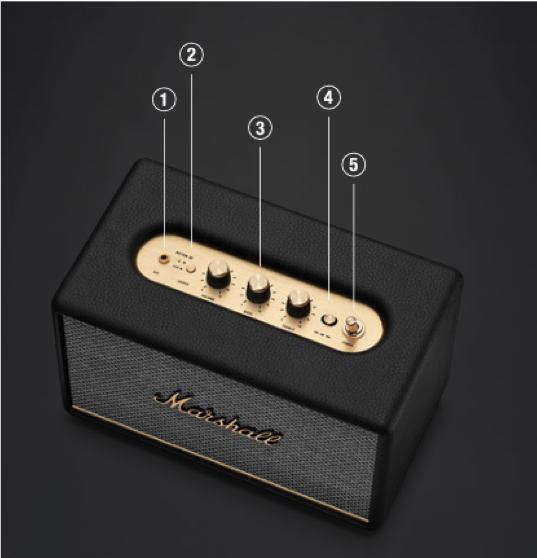
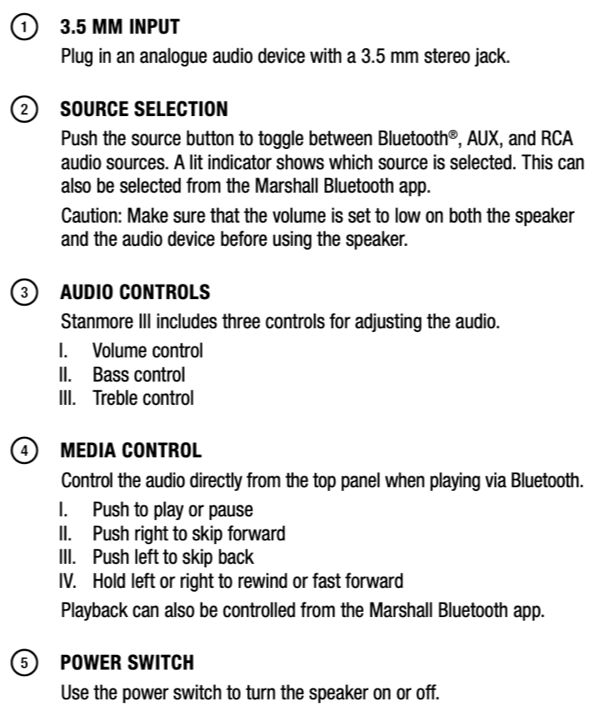
Bluetooth pairing
- 1. Use the source button (2) to select Bluetooth
- 2. Push and hold the source button until the Bluetooth LED pulses red
- 3. Selection ACTON III from your audio device’s Bluetooth list
The sound system can be connected to two Bluetooth devices at the same time. If a connected device is playing, a second connected device cannot start playing until the first device is paused.
AIR CONDITIONERS LIVING ROOM
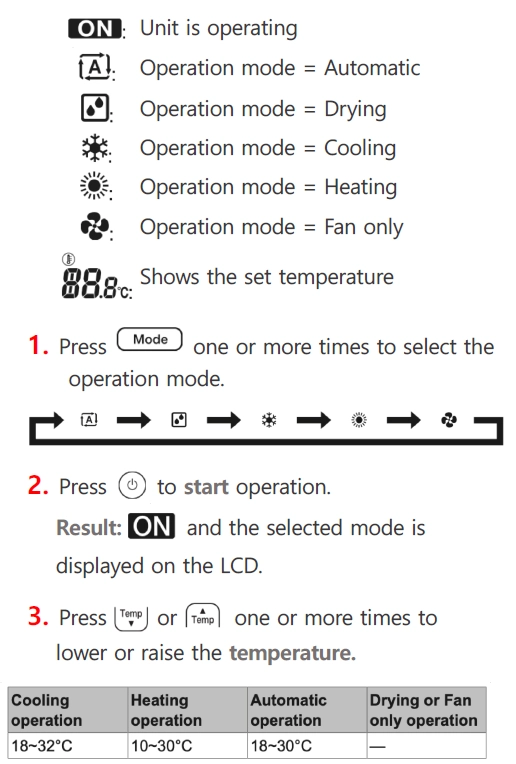
You can quickly start operation by following 3 steps:
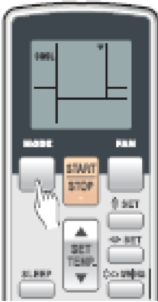
- The indoor unit’s Operation indicator Lamp (green) will light.
- The air conditioner will start operating.
- Press the button consecutively until you reach the AUTO mode.
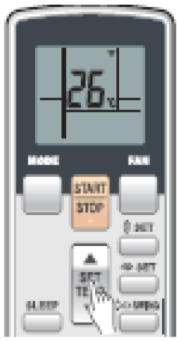
- Press to raise the thermostat setting.
- Press to lower the thermostat setting.
Use the COOL mode during summer or when it is hot in the apartment. We recommend to set the temperature to 21℃ and keep it constant. The room will cool down after some time and the AC will function much better than when you set it at lower temperatures.
Use HEAT mode during winter or when it is cold in the apartment. We recommend to set the temperature to 24℃ and keep it constant. The rooms will warm up after some time.
- When you switch on the air conditioning, the unit will operate at very low fan speed for about 3-5 minutes, after which it will switch to the selected fan setting.
AIR CONDITIONERS BED ROOM
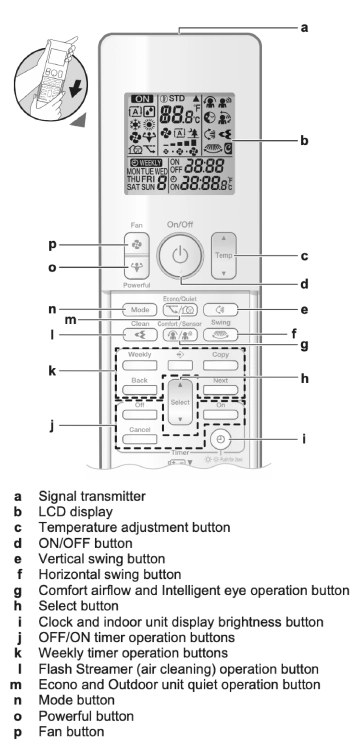
To start/stop operation mode and to set the temperature.

GARBAGE DISPOSAL
How:
Sort the garbage into:
- 1 Household garbage (container left of the fridge);
- 2 Plastic;
- 3 Glass.
When:
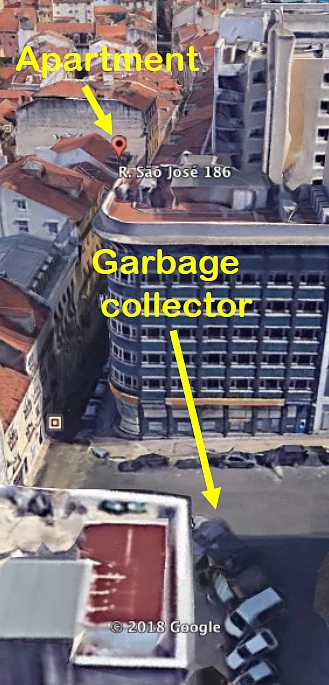
Guests are responsible for the disposal of the garbage accumulated during their stay and should take the garbage out upon leaving the apartment. We advise to take the garbage out in the evening (there is a pick-up service every night).
Where:
TRANSPORT
Taxi
- +351 219 362 113
Uber
Metro de Lisboa
Electric Scooters Lime
Europcar Car Rental
- +351 210 532 783
Tourist buses
Trains
- To Cascais from Cais do Sodré station
- To Sintra from Rossio station
- Bound north and south from Oriente station
- More information on trains, see: https://cp.pt
GROCERY SHOPS

GROCERY SHOPS
Fruits & vegetables
- Rua de São José 174
Mini-market
- Rua de São José 156
Mini-Market & fruits
Supermarket ALDI (7/7, 08:30 - 21:00)
- Rua de São José 189 - 193
Supermarket Minipreço (7/7, 08:30 – 21:00)
- Rua Barata Salgueiro 4
PHARMACY
Farmácia Morais Sarmento
RESTAURANTS
Solar dos Presuntos
- +351 213 424 253
- https://solardospresuntos.com
ARTS AND CULTURE
Sé Catedral
LISBON CITY TAX

The city of Lisbon has a tourist tax for overnight stays. The tax of 4€ is applied to guests over the age of thirteen, per person and per overnight stay, up to a maximum of 7 nights per stay (max. 28€).
Guest that have made the reservation via Airbnb or Booking pay directly to the platform upon reservation. Guest with reservations from other platforms, will need to pay us upon check-in. We will provide the guests a receipt of payment within 48h after check-in.
For more information, please see: https://www.cm-lisboa.pt
ACCOMMODATION BULLETIN

All short-term rentals in Portugal are required to report the presence and ID details of all their guests to the Portuguese Immigration and Borders Service (SEF). Therefore, guests must fill the SEF form and show ID upon check-in, if they haven’t done so beforehand via the self-check-in procedure.
For more information, please see: https://siba.sef.pt/legislacao-e-protocolos/